Tomatoes are my favorite summer thrill: a small green cluster that slowly swells and turns into a sweet, sun-warmed bite. But nothing punctures that joy faster than strange leaf patterns that whisper, "something's off." Over the years I've learned to read tomato leaves like a thermometer—spotting early nutrient deficiency by shape, color and pattern helps you act quickly. In this post I’ll show you how to identify the most common deficiencies from leaf patterns and how to correct them using a simple, practical plan I call the “three waterings” fix. It’s fast, effective and gentle on the plant and the pocket.
Why leaf patterns matter (and what to look for)
Leaves are the canary in the coal mine for your tomato plants. They show nutrient problems earlier than stems or fruits because nutrients move to younger tissue first, or are trapped in older leaves when mobility is limited. When you learn to read the pattern—where on the plant the symptoms appear, whether the discoloration is between veins or along them, whether margins curl or entire leaves yellow—you can narrow down the cause quickly.
- Older leaves vs. newer leaves: Problems on older leaves usually point to mobile nutrient deficiencies (nitrogen, magnesium, phosphorus). Problems on young leaves indicate immobile nutrient shortages (iron, manganese, calcium).
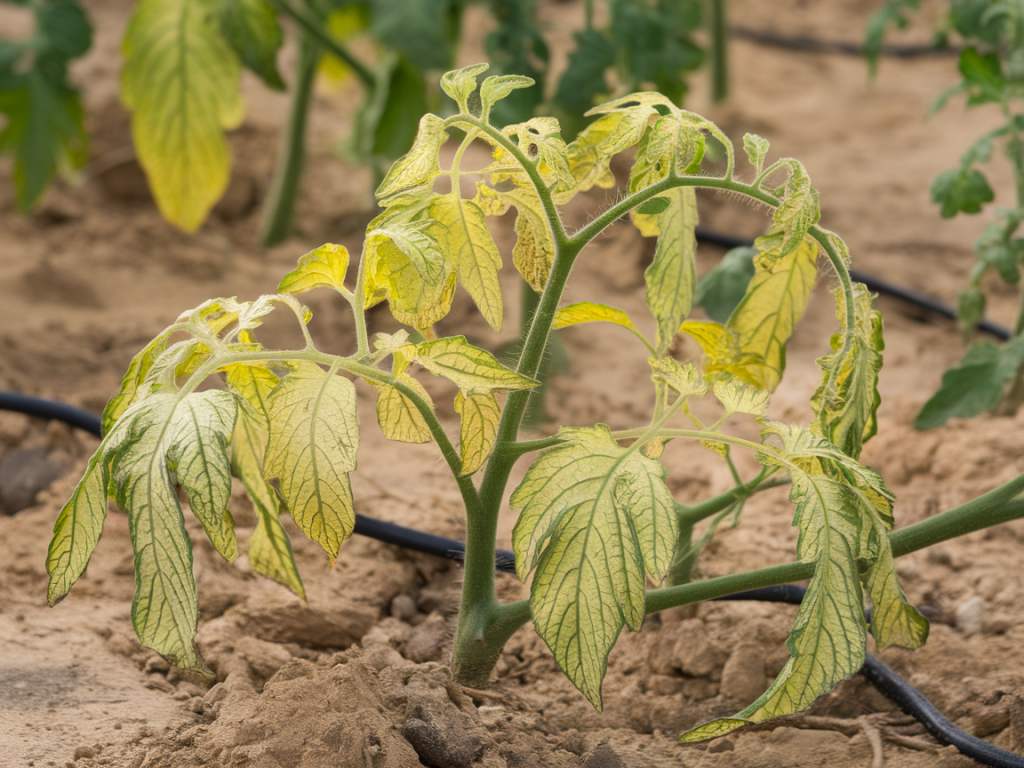
- Interveinal chlorosis (yellowing between veins): Often a micronutrient issue (iron, manganese) or magnesium if on older leaves.
- Uniform yellowing: Typical nitrogen deficiency.
- Tip and margin browning or cupping: Can be potassium, salt burn, or irregular watering.
- Blotchy necrosis or blossom end rot on fruit: Calcium-related or inconsistent moisture.
Quick diagnostic checklist
I like to do a fast mental checklist when I see odd leaves:
- Where on the plant? (older, middle, newest leaves)
- Color pattern: overall yellow, between veins, mottled, brown edges?
- Other stresses present? (wet soil, drought cycles, pests)
- Recent changes? (fresh soil, new fertilizer, transplant shock)
| Symptom (leaf pattern) | Most likely nutrient | Typical plant location | Notes |
|---|---|---|---|
| Uniform yellow older leaves | Nitrogen | Lower leaves first | Plant looks pale overall; yields drop if not corrected |
| Interveinal chlorosis on young leaves | Iron | New growth | Veins stay green, leaf tissue turns yellow |
| Interveinal chlorosis on older leaves | Magnesium | Lower leaves | Often with leaf curl or slight bronzing |
| Brown margins or tips, curling | Potassium or salt stress | Leaf edges | Check fertilizer application and watering |
| Blotchy areas, blossom-end rot | Calcium (or uneven water) | Fruit and young tissue | Calcium often tied to erratic moisture |
The “three waterings” corrective plan (step-by-step)
When I see early deficiency signs, I prefer a staged correction: three targeted waterings over a week. It gives the plant an easy-to-digest nutrient boost without shocking roots or causing salt buildup. Here's how I do it in the garden or containers.
Materials you’ll need
- Liquid balanced fertilizer (example: a 10-10-10 or 5-5-5 NPK) or fish emulsion for organic option (e.g., Neptune's Harvest)
- Chelated micronutrient mix or iron chelate (for iron chlorosis)
- Epsom salts (magnesium sulfate) for magnesium deficiency
- Calcium source (calcium nitrate or crushed eggshell tea) for calcium issues
- Measuring cup or spoon, watering can or hose with gentle nozzle
First watering — the gentle wake-up (Day 0)
The goal here is to flush the root zone and give a mild, balanced nutrient top-up.
- Mix: 1/2 the recommended label rate of your liquid balanced fertilizer in 4–8 liters (1–2 gallons) of water per mature plant. For containers use 1–2 liters depending on pot size.
- Method: Water slowly at the base until the soil is moist to depth, not puddled. This leaches salts and provides a gentle feed.
- What this fixes: mild nitrogen shortages, reverses early salt stress and rehydrates roots.
Second watering — target the suspected nutrient (Day 3)
After the first feeding the plant is receptive. Now target the nutrient indicated by leaf patterns.
- Nitrogen (older leaves yellow): Use a diluted fish emulsion or a half-strength balanced feed again. Feed at label rate or slightly lower.
- Magnesium (interveinal yellowing on old leaves): Dissolve 1 tablespoon Epsom salts per gallon (≈4 liters) of water and apply around the root zone.
- Iron (interveinal chlorosis on new growth): Use iron chelate at label rate as a soil drench. If using a foliar spray, mix according to product directions and spray new leaves in the cooler hours.
- Potassium (browned margins): Use a potassium-rich liquid (bananas soaked in water are a home trick but better: potassium sulfate or a trace-mineral fertilizer with higher K) at half strength.
- Calcium (blossom end rot): Apply calcium nitrate as a soil drench per package directions; avoid lime which acts slowly. Also stabilize moisture (see watering routine below).
Third watering — reinforce and settle (Day 7)
This final watering reinforces improved uptake and settles the soil biology. I give a mild compost tea or worm tea if I have it; if not, another light balanced feed at quarter to half strength works.
- Compost tea: Brewed 24–48 hours and applied as a root drench helps microbes make nutrients more available.
- If you used chelates or Epsom salts previously, stick to plain water or a very diluted balanced feed to avoid overdoing one element.
Important timing and watering tips
- Water early in the morning so leaves dry quickly and plants can use the nutrients all day.
- Don’t alternate heavy foliar sprays and strong root drenches in one day—space them by at least 24 hours.
- Consistency matters most for calcium-related problems: keep soil evenly moist. Use mulch (straw or wood chips) to reduce fluctuations.
- Always check pH if symptoms persist. Tomatoes prefer slightly acidic soil (pH 6.0–6.8). Iron and manganese become unavailable in alkaline soils.
When to use foliar feeding
Foliar feeding can speed relief for immobile nutrient deficiencies like iron. I’ll spray a chelated iron foliar solution on cool mornings or evenings, avoiding hot sun. Remember: foliar feeds give quick visual improvement but are short-lived. They're best combined with a soil correction plan.
Preventing future nutrient problems
- Feed regularly with a balanced organic fertilizer or slow-release granules at planting and mid-season—this avoids sudden deficiencies.
- Add compost each season to build a steady supply of nutrients and improve soil structure.
- Test your soil every 2–3 years. A simple home kit helps catch pH drift; a lab test gives a full nutrient picture.
- Rotate crops and avoid repeated heavy nitrogen use late in the season (it stimulates foliage at the expense of fruit).
- Use a quality potting mix in containers and fertilize more frequently but lightly—container tomatoes rely entirely on you for nutrients.
Troubleshooting common issues after treatment
If the three waterings don’t fix the problem within 10–14 days, re-check these possibilities:
- pH imbalance locking out nutrients (test and correct with sulfur to lower pH or lime to raise it, cautiously).
- Pest or disease causing similar symptoms—look for mites, aphids or early blight that can mimic nutrient stress.
- Overfertilization: brown tips and wilting can result from salt burn. If you suspect this, flush the soil thoroughly with plain water.
- Root damage from nematodes or physical disturbance—stunted growth with odd leaf patterns could be root-related.
Reading your tomato leaves gives you a huge head start on saving a crop. The three waterings approach is a low-risk, high-reward way to correct most early nutrient issues: gentle flush and feed, targeted correction, then reinforcement. Over time you’ll learn which patterns show up first in your bed or pots, and you’ll adjust timings and products to suit your soil and climate. If you want, tell me the exact leaf pattern you’re seeing and your soil type (container, raised bed, clay, sandy)—I’ll help you narrow it down and choose the right products and rates for your situation.