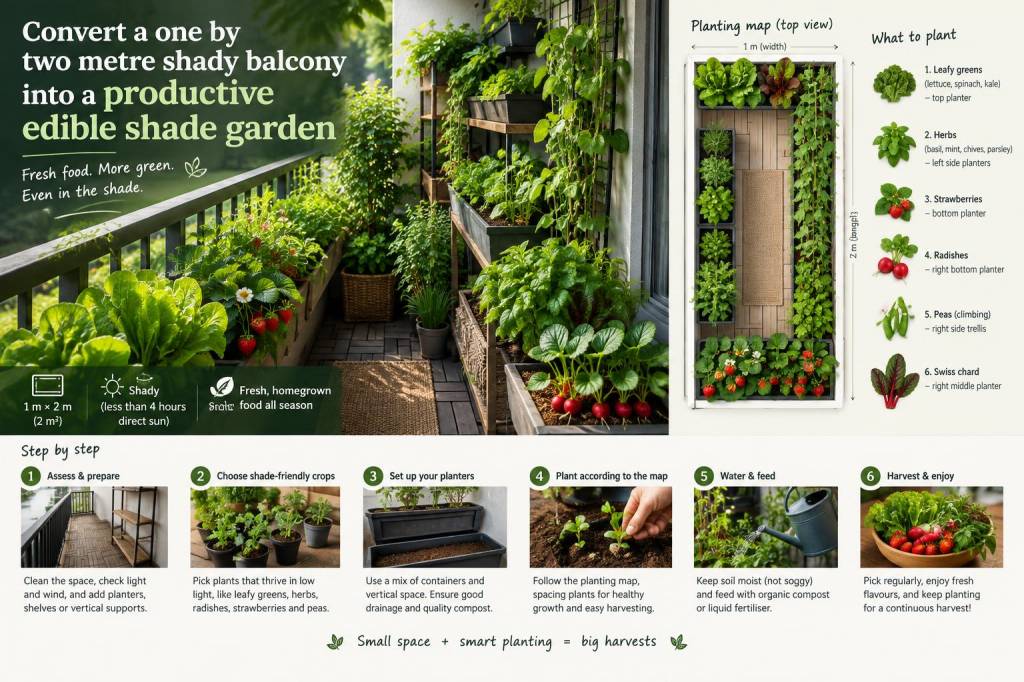
When I first inherited a narrow, shady balcony that measured just 1 by 2 metres, I figured edible gardening was off the table. But with a little creativity, the right plant choices and a simple planting map, I turned that tight, north-facing space into a productive edible shade garden that feeds us and brings daily joy. Below I share exactly how I planned, planted and maintain a compact shade-friendly edible balcony—step by step—so you can do the same even with limited light and space.
A quick reality check: what "shade" means for edibles
Not all shade is equal. My balcony gets bright, indirect light for much of the day but no direct sun—classic partial to full shade. That means leafy greens, herbs and some root crops thrive, while fruiting plants like most tomatoes and peppers struggle. When planning, think in terms of light hours and quality: dappled morning sun is different from a permanently north-facing wall that never receives direct rays.
Design goals for a 1 x 2 m edible balcony
I set three simple goals for my layout:
These priorities led me to a layered approach: tall verticals at the back, medium containers in the middle, and shallow troughs at the front. That gives every plant its light niche and makes harvesting comfortable.
Essential materials and tools
For a compact balcony I recommend:
Shade-friendly edibles I recommend
Here are the plants that have worked best for me in low light—mix textures and harvest types for a satisfying mini-garden:
Step-by-step planting map and layout
This is the exact arrangement I used. Imagine the balcony as a rectangle 1 m (width from railing to wall) by 2 m (length along the railing). The railing side is the "front" that faces the most light.
| Front (railing) | Middle | Back (against wall) |
Railing planter (120–150 cm): mixed salad trough with alternating rows of lettuce, mizuna and baby spinach for continuous cutting. Add a few trailing nasturtiums at the ends for pollinators and edible flowers. | Two medium pots: one with a mix of parsley and chives; the other with compact pak choi and baby kale. Pots on small rolling plant caddies make rearranging easy. | Vertical trellis with sugar snap peas (left) and a pocket planter (right) with staggered plantings of cilantro and lemon balm. A slim pot with mint sits in the corner—mint confined so it doesn't overrun everything. |
Planting notes:
Soil, fertilising and watering routine
Shallow containers dry out faster at the top but can stay waterlogged at the base. I use a free-draining mix and water from the top until it runs out the drainage holes, then allow the top 1–2 cm to dry before the next drink. In summer I water every day or every other day, in cooler months every 3–4 days.
Fertiliser routine:
Pest and disease tips for shaded balconies
Shade increases humidity, which can encourage fungal issues. I manage this by:
Seasonal planting calendar for the balcony
Here’s a compact calendar I use—adjust for your local climate:
| Season | What to sow/plant |
|---|---|
| Spring | Start peas, early lettuce, pak choi, cilantro, parsley |
| Summer | Continuous lettuce sowings, chard, basil (if you have a slightly brighter corner), start radishes |
| Autumn | Spinach, winter lettuces, kale, garlic chives |
| Winter | Protect with a frost cloth; grow hardy greens and overwinter herbs like chives and parsley |
Practical styling and comfort tips
A productive balcony should still be a pleasant space to sit. I added a slim foldaway bistro table that clips to the railing and a folding stool. Use matching pots for a cohesive look and choose a neutral-toned trough. Add a small tray with clippers and a spray bottle so harvesting and maintenance become quick, enjoyable rituals.
If you try this planting map, start small—don’t plant every container at once. Experiment with one or two favorite greens and a few herbs, then expand as you learn what thrives in your microclimate. The reward of snipping fresh salad leaves from a shady balcony is worth the effort: a tiny edible oasis that proves productive gardening is possible even in modest, low-light spaces.