I still remember the first time I tried grafting an apple tree: my hands were sticky with sap, my bench was cluttered with budding scion wood, and I was alternately nervous and thrilled. That year the grafts took, and the satisfaction of watching a new cultivar thrive on a hardy rootstock hooked me for good. Grafting is one of the best DIY projects for gardeners who want better fruit, improved disease resistance, or simply to mend a beloved but failing tree. Below I’ll walk you through the methods I use, the supplies you'll need, timing, and the troubleshooting tips that save most beginners from avoidable mistakes.
Why graft apples?
There are a few reasons I graft apples instead of growing from seed or buying a new tree:
Clonal fruit quality: Apple seeds don’t come true to type — grafting preserves the exact variety and flavor you love.Disease resistance: Choosing the right rootstock can increase resistance to diseases and improve tolerance to wet or poor soils.Size control: Rootstocks determine tree vigor — dwarf, semi-dwarf or standard — letting you plan for small backyard orchards or espaliered trees.Repair and diversification: You can repair trunk damage, replace failed branches, or create a multi-variety tree for cross-pollination and extended harvest.What you'll need
Gathering the right tools and materials makes the difference between messy failures and tidy successful grafts. I keep a ready kit with:
Sharp pruning knife (a Japanese grafting knife or a florist’s knife works well)By-pass pruners and a folding saw for thicker woodGrafting tape (rubber/parafilm) and/or grafting waxRootstock(s) and scion wood — see the table below for common rootstocksAlcohol wipes to disinfect toolsLabel tags and a permanent markerPruning sealant or horticultural clay for large cleft graftsA clean work surface and a lithe pair of gloves (optional)| Rootstock | Vigor | Notes |
|---|
| M.9 | Dwarf | Popular for small gardens, good precocity; needs staking |
| M.26 | Semi-dwarf | Good balance of size and productivity, reasonably hardy |
| MM.111 | Semi-vigorous | Good for heavier soils, drought tolerant |
| MM.106 | Vigorous | Better for full-size trees, not ideal for shallow soils |
Timing and scion selection
For most grafts I work in late winter to very early spring, when the rootstock is still dormant but scion wood is available from the previous season's growth. This is when cambial activity starts and the budwood will be ready to push once the graft union forms. In mild climates, early spring right before budbreak is ideal. For whip-and-tongue or cleft grafts, scions should be pencil-thickness, straight, and have good, healthy buds.
Choose scion wood from healthy, productive trees — the previous season’s one-year-old wood is perfect. Avoid wood that’s diseased, sunburned, or very weak. Keep scion wood wrapped and chilled until you're ready to graft; I store mine in the fridge wrapped in damp paper towel and a zip-top bag for up to a week.
Which grafting method to use
The best technique depends on the diameter of the rootstock and scion:
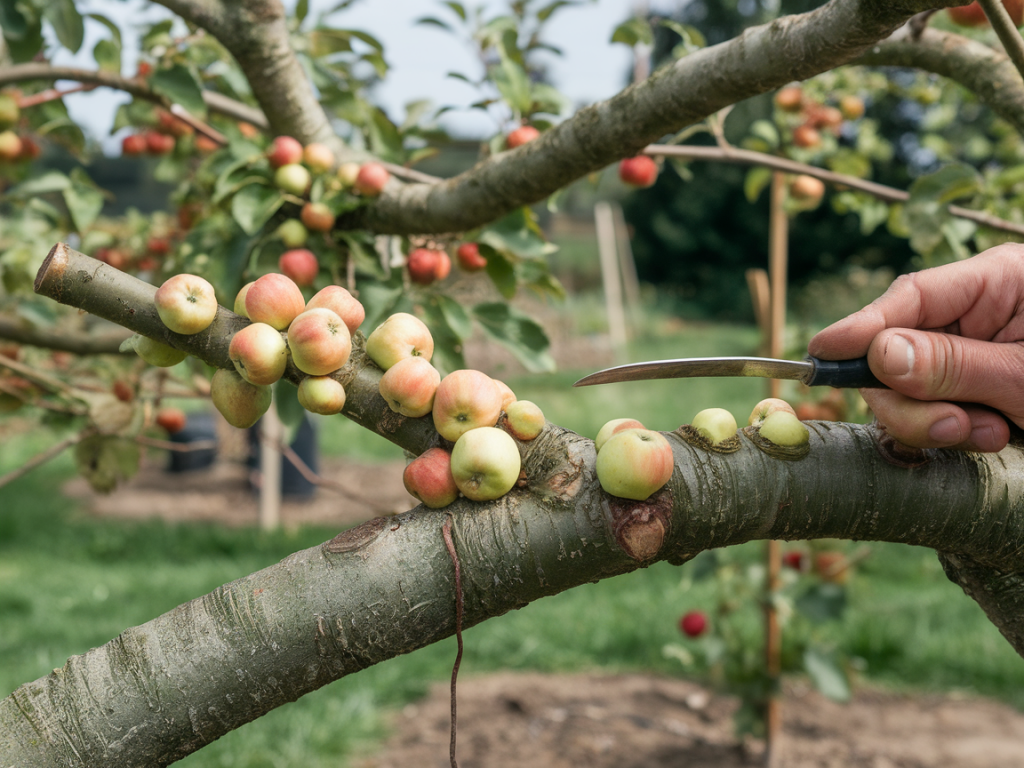
Whip-and-tongue graft — my go-to for same-diameter scion and rootstock (1/4"–3/4"). It gives a lot of cambial contact and great strength.Cleft graft — ideal for joining a smaller scion to a larger rootstock or for changing the top of an older tree. Very useful for repair work.Bark graft — useful in spring when the rootstock is larger and the bark lifts easily from the wood; you can insert multiple scions around the trunk.Approach graft — handy when both parts are still attached to their own roots (useful for grafting ornamentals and some specialty situations).Step-by-step: whip-and-tongue (my favorite)
This graft is tidy and strong — perfect for young trees and nursery-style grafting.
Match scion and rootstock diameters as closely as possible.Make a smooth sloping cut about 1.5–2 inches long on both scion and rootstock.On both pieces make a short vertical cut (the “tongue”) about a third of the way through the cut. The tongues should interlock.Fit the two pieces together so cambium layers (just under the bark) align on at least one side; full alignment on multiple sides is better.Wrap tightly with grafting tape or parafilm to exclude air and prevent desiccation. Leave the top buds exposed.Seal any exposed wood with grafting wax if needed, especially in cold or windy sites.Label the graft with variety and date.Step-by-step: cleft graft
Use this when the rootstock is much thicker than the scion:
Cut the rootstock horizontally across the top.Split the center down the middle to make a cleft (use a grafting chisel or a wedge carefully).Shape the base of each scion into a wedge and insert them into the cleft so cambium lines up along one or both sides.Tighten with grafting tape and seal the exposed wood with wax or sealant.Aftercare
Here’s what I do in the weeks and months after grafting:
Keep grafts protected from sun and wind — a temporary shade can reduce desiccation.Check moisture and water the root system if the weather is dry; the graft union can't pull up water until it heals.Remove any suckers or growth from below the graft (these are from the rootstock and will outcompete the scion).When the scion shows active growth, gradually cut back any protective supports but leave tape in place until the union is strong; many grafting tapes degrade on their own or can be carefully removed after a season.Stake if you used a dwarf rootstock (e.g., M.9) — these need support until well-established.Common problems and troubleshooting
Graft fails to take: Often caused by poor cambial contact, desiccation, or late timing. Re-graft in the next dormancy if the scion shrivels or the graft shows no callus after several weeks.Scion buds swell but collapse: This indicates desiccation or rapid temperature swings. Use parafilm and shade; avoid grafting on very windy exposed days.Excessive growth from rootstock: Remove vigorously. If left, they will rob vigor from the scion.Incompatibility: Most Malus domestica cultivars are compatible with common apple rootstocks, but intergeneric grafts (e.g., pear onto apple) usually fail.Notes on disease resistance and rootstock choice
Rootstocks differ in disease resistance and soil tolerance. If you have a history of fire blight, root rot, or apple replant disease in your soil, consider disease-tolerant rootstocks and good orchard hygiene. For orchard-scale or higher-investment projects, look at certified disease-resistant rootstocks from reputable nurseries (e.g., Malling or Geneva series — G. series rootstocks have been bred for specific disease resistances).
Resources and supplies I recommend
Felco pruners for clean cuts.Parafilm or specialized grafting tape from gardening suppliers (e.g., Growers Supply).Grafting knives by Bahco or Japanese-style grafting knives for precision.Local nurseries for certified rootstock and scion wood — buying locally often means better climate-suited material.Grafting is a bit of craft and a bit of patience. If your first attempts wobble, don’t be discouraged — most successful grafters I know had a few dry seasons before they found their rhythm. Keep notes on which combinations worked, the timing, and the methods; that notebook becomes a priceless orchard diary. If you want, tell me your climate and what varieties you’re trying to combine, and I’ll help you pick a rootstock and a graft type that suits your plot.