Plant Care

Exactly when and how to harden off seedlings on a windy apartment balcony without losing a tray

Exactly when and how to harden off seedlings on a windy apartment balcony without losing a tray

Windy balconies can feel like a battleground when you're trying to harden off tender seedlings. I learned the hard way during my first urban gardening season: a gust sent an entire tray of brassicas sliding across concrete and left me replanting seedlings that never recovered. Since then I've developed a gentle, effective routine that protects trays, builds hardiness and prevents those heart-sinking moments. Below I share exactly when to start, how to stage the exposure, and practical fixes to keep trays from blowing away.

When to start hardening off

I always begin hardening off seedlings once they have at least two true leaves and are well-rooted in their trays—not floppy or rootbound. For most vegetables and annuals that means roughly 4–6 weeks after sowing, but timing depends on species and local climate. Start the process about 7–14 days before your planned transplant date if you have a relatively mild spring. If your spring is changeable and often windy, give yourself closer to 14 days.

Check the weather: choose a stretch with mild daytime highs (12–20°C / 55–68°F) and cool nights but not frosty. Avoid starting on a day with strong winds forecasted—gentle breezes are ideal for hardening because they strengthen stems without desiccating the plants.

How I stage the exposure—a simple schedule

My favorite approach is gradual and predictable. I follow this basic rhythm and adjust for each species' sensitivity.

Day rangeOutdoors per dayNotes
Days 1–2 1–2 hours Morning sun, light breeze, back inside before wind picks up
Days 3–5 3–4 hours Include midday sun if not too hot; sheltered spot
Days 6–9 6–8 hours Leave out if breezes are mild; bring in overnight
Days 10–14 All day, nights inside or protected Extend outdoors; reduce watering slightly

That table is a template—I make seedlings spend an extra few days indoors if winds are consistently strong, and I shorten the schedule for hardy plants like kale or onions.

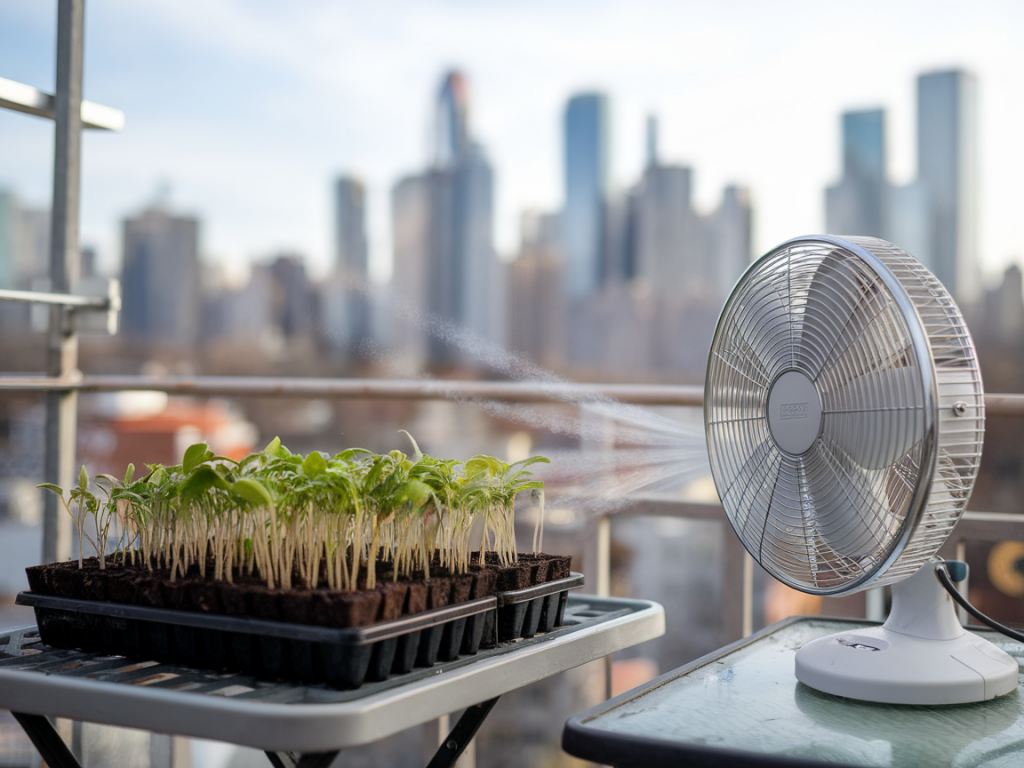
Protecting trays from wind: anchoring and windbreaks that actually work

My balcony is full sun but gusty, so I use layered protection: anchor the tray, reduce wind at the tray-level, and protect seedlings directly. Here are techniques that saved me many times.

  • Weighted anchors: Place a flat paving slab, a pair of bricks or a decorative terracotta saucer partially on the tray edge. For lightweight plastic trays, even a smartly placed filled water bottle or a bag of compost provides enough hold. I often use a 5–10 kg paving slab for larger nursery trays.
  • Anti-slip mats: A simple rubber anti-slip mat (sold for rugs or kitchen use) under trays prevents sliding on smooth balcony tiles. They’re cheap and reusable.
  • Bungee cords or velcro straps: Loop a small bungee cord over the tray and hook it to the railing or a heavy pot. Velcro plant ties work too if you don't want elastic tension. I keep a pair of short bungees in my gardening caddy for this purpose.
  • Temporary windbreaks: Erect a low windbreak around the tray using breathable materials—horticultural fleece, shade cloth (30–50% density), or even an open weave tomato cage wrapped with netting. The aim is to reduce gust force while allowing air movement so humidity doesn't build up.
  • Use larger containers: If trays are persistently tricky, transfer seedlings into small pots (7–9 cm / 3–4 inch) for hardening. Heavier pots are less likely to fly off and give seedlings more buffer.
  • Micro-protection: cloches, collars and clever covers

    For extra-sensitive seedlings I use cloches or collars that provide shelter without overheating. My favorites:

  • Clear plastic cloches: Reusable cloches or cut 2-litre plastic bottles with the bottom trimmed create little greenhouses. Make a few vent holes to prevent excessive heat and to reduce humidity overnight.
  • Horticultural fleece/holey covers: A single layer of fleece draped and pegged down gives frost protection and reduces wind shear. Fleece is breathable and lets light through—perfect for early stages.
  • Light tunnels: For trays in a row I use a low tunnel built from flexible PVC or metal hoops covered with mesh or fleece. This is especially useful on balconies where the wind funnels in one direction.
  • Watering, feeding and other care during hardening

    Wind increases evapotranspiration, so monitor moisture more closely. I follow these rules:

  • Water in the morning so leaves dry before evening, reducing fungal risk.
  • Use a gentle spray or bottom-water trays to avoid dislodging seedlings.
  • Reduce fertilizer slightly while hardening; plants focus on building structure, not lush growth.
  • Check trays daily for run-off, salt build-up or drying edges—balcony conditions can be drier than ground beds.
  • Troubleshooting common problems

    If leaves look scorched after a sunny, windy day, the seedlings were exposed too quickly; move them back to more sheltered hours and reduce direct midday sun. If stems are bending or seedlings look brittle, those are signs of dehydration—soak the trays and step back the duration outdoors.

    If trays still slide despite anchors, consider switching to heavier propagation modules, placing trays behind a low wall or investing in a balcony tray rail system. I once used a pair of L-shaped metal brackets screwed into the decking to hold trays in place—drastic, but effective for a long-term balcony setup.

    Brand and product tips I use

    I often use the following items because they balance cost and practicality:

  • Small bungee cords (Max 30 cm) with plastic-coated hooks—easy to loop over trays and attach to railings.
  • Rubber anti-slip mats from hardware stores for under-tray stability.
  • Horticultural fleece (e.g., Agrotextile 17 g/m²) for lightweight wind and frost protection.
  • Reusable clear cloches or repurposed 1.5–2 L plastic bottles for seedling-level shelter.
  • Final practical checklist before leaving trays all day outdoors

  • Are seedlings well-rooted and at the right stage? (2+ true leaves)
  • Is the weather forecast for mild temperatures and limited strong gusts?
  • Have I anchored trays or used weight/anti-slip measures?
  • Is there a windbreak or cloche to reduce direct gusts?
  • Have I watered in the morning and checked drainage?
  • Do I have a quick plan to bring trays in if weather changes?
  • Hardening off on a windy balcony is mainly about patience and layered protection. A few small investments—a rubber mat, some bungee cords, a bit of fleece—and a steady, gradual schedule will keep trays in place and seedlings thriving. If you want, tell me what you grow and how windy your balcony is, and I’ll suggest a tailored hardening schedule and setup plan.

    You should also check the following news:

    Weeknight plan: turn three supermarket herb pots into a layered balcony herb garden that saves water
    DIY Projects

    Weeknight plan: turn three supermarket herb pots into a layered balcony herb garden that saves water

    I love a quick, satisfying project that turns an ordinary weeknight into something green and...

    Jun 14 Read more...
    Which bee-friendly annuals bloom through summer heat and exactly when to sow them for nonstop pollinator visits
    Seasonal Planting

    Which bee-friendly annuals bloom through summer heat and exactly when to sow them for nonstop pollinator visits

    When summer arrives and temperatures climb, many gardeners worry that blooms — and the...

    May 15 Read more...