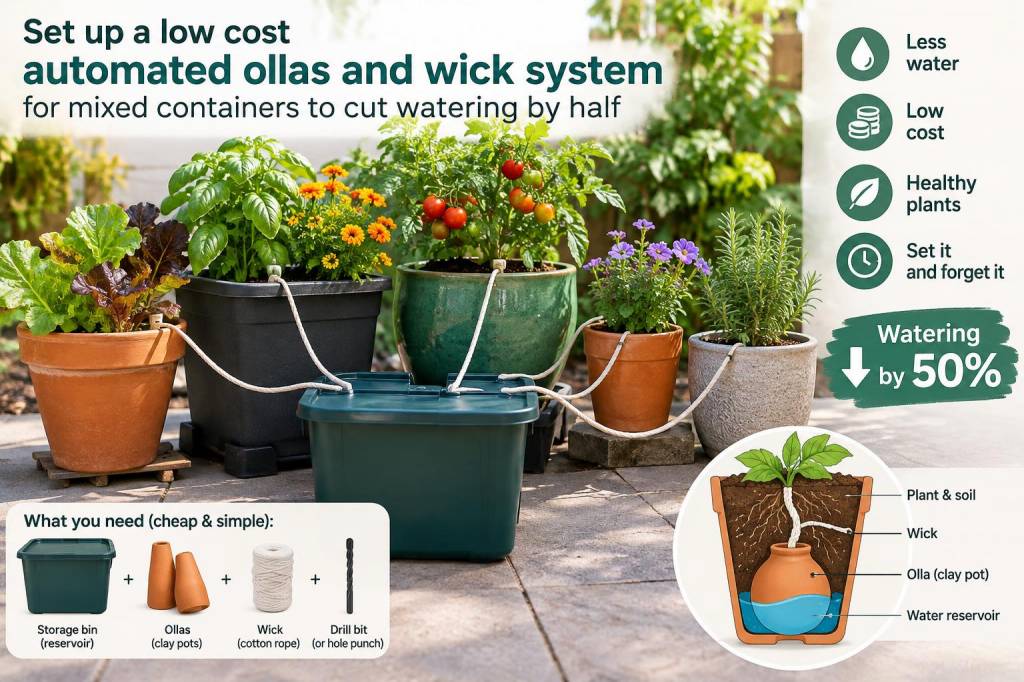
I’ve been experimenting with water-saving systems in my containers for years, and the combination I keep coming back to is a hybrid ollas + wicking setup. It’s cheap, reliable, and—when done right—can cut your watering frequency and volume by at least half. Below I’ll walk you through how I build a low-cost automated system for mixed containers (vegetables, herbs, perennials) that’s perfect for balconies, patios, or grouped pots on the ground.
Why I use an ollas and wick hybrid
Ollas are unglazed clay pots buried in the soil that slowly release moisture; wicks are simple capillary materials that move water from a reservoir into the potting mix. Together they cover each other’s limits: ollas provide deep, targeted water for root zones, while wicks keep the surface and root tips from drying out between deep irrigations. In mixed containers—where some plants like drier conditions and others need consistent moisture—this combo lets me tune water delivery without constant monitoring.
Benefits I see every season
Water savings: Direct delivery to the root zone reduces surface evaporation and runoff.Less frequent watering: Containers stay usable for multiple days to weeks, depending on heat and plant size.Healthier roots: Moisture gradients encourage roots to explore deeper rather than staying at the surface.Low cost and easy to maintain: Parts are inexpensive and replaceable—no electricity required.Materials I use (budget-friendly)
Here’s a basic shopping list that I typically assemble from garden centers, thrift stores, or online marketplaces:
| Item | Purpose | Approx. cost |
| Unglazed olla or terracotta jar (1–3L) | Primary root-zone reservoir | €5–€20 |
| Plastic reservoir (small bucket or recycled bottle) | External water source for wick | €0–€5 |
| Wicking material (cotton rope, cotton tape, or felt strips) | Capillary bridge between reservoir and soil | €2–€8 |
| Gravel or broken pot shards | Drainage and stability around olla | €0–€3 |
| Potting mix (light, well-draining) | Container medium—amend with compost/perlite | €5–€15 |
| Mulch (bark, straw, or coco coir) | Reduces evaporation at surface | €2–€6 |
Step-by-step installation (my typical process)
I’m describing a setup for a medium container (25–40 cm / 10–16 in diameter) with one olla and a wick-fed auxiliary reservoir. Scale up for larger pots with additional ollas/wicks.
Choose your container and plants. Place thirstier plants (tomatoes, basil) closer to the ollas; drier-loving plants (lavender, rosemary) nearer the pot edge.Prepare the olla. If it’s new, soak it briefly to avoid it drawing too much moisture immediately. If you use a recycled unglazed jar, clean it first.Place a few cm of gravel in the bottom for drainage and to create a stable base. Position the olla off-center rather than dead centre—this gives roots room to explore and makes planting easier.Mix potting soil with compost and a little perlite for aeration. Backfill around the olla, firming gently so the olla is snug but not cracked.Install the wick reservoir: I use a small recycled plastic container taped to the pot’s inner rim or tucked next to the container (outside-facing). Thread one end of a cotton rope or flat wicking strip into the reservoir so it reaches the bottom, and bury the other end 5–8 cm into the potting mix near the opposite edge from the olla. Ensure the wick path is reasonably straight—kinks reduce flow.Mulch the soil surface. A 3–4 cm layer of mulch reduces evaporation and hides the wick neatly.Fill the olla and the external reservoir with water. For the olla, pour slowly until water appears at the top opening or you reach the fill line. The first several fills will condition the system.Monitor for 24–48 hours. Roots will quickly start exploring toward the moist zones. Adjust wick placement if the soil near it stays dry—bury it a little deeper next to root zones.Tuning and watering schedule
Every site behaves differently—temperature, sun, wind, and plant water use vary. Here’s how I tune the system:
Check soil moisture by finger test 5–8 cm down. For most mixed containers I aim for slightly moist but not waterlogged.Keep the reservoir topped up. For my medium pots in summer I refill the external reservoir every 3–5 days; the olla usually needs topping every 7–14 days depending on heat.Use ollas more for deep hydration and the wick for surface moisture. If daily light-feeding is needed (seedlings, thirsty herbs), increase wick thickness or add a second wick.In cool seasons reduce fills; plants use less and the system holds moisture longer.Common problems and fixes
Wick stops drawing: Cotton can become clogged or dirty. Replace the wick or soak it in hot water and a little vinegar, then rinse.Olla dries out too fast: Check for cracks, ensure it’s unglazed, and consider a larger olla or additional ones. Mulch and shading reduce surface evaporation.Overly wet soil: Reduce frequency of ollas filling and ensure good drainage. Use a finer potting mix with more grit if water sits.Pests attracted to reservoir: Cover reservoir with mesh to stop mosquitoes; use a sealed bottle with a small wick if insects are a problem.Costs and time investment
For a row of five medium containers I spend around €40–€70 total when reusing materials—mainly ollas, wicking rope, and mulch. Installation takes about 30–45 minutes per pot the first time; after that it’s topping up reservoirs and seasonal checks. Compared to automated drip systems, this is low-cost, no-electricity, and low-maintenance.
My favorite tweaks
I sometimes use glazed wine bottles (neck down) as miniature ollas for shallow-rooted herbs—cheap and decorative.For long trips I add a second external reservoir (a 2–3L bottle) with a thicker wick to extend autonomy to 2–3 weeks.Combining this with a layer of water-retaining granules in the soil can further reduce watering in very hot climates.If you’re curious about costs for your exact setup or want help choosing ollas sizes for specific plants, tell me the pot dimensions and what you’re growing—I’ll sketch a tailored plan. I love these easy, hands-off systems because they free up my weekends while keeping plants happily hydrated.