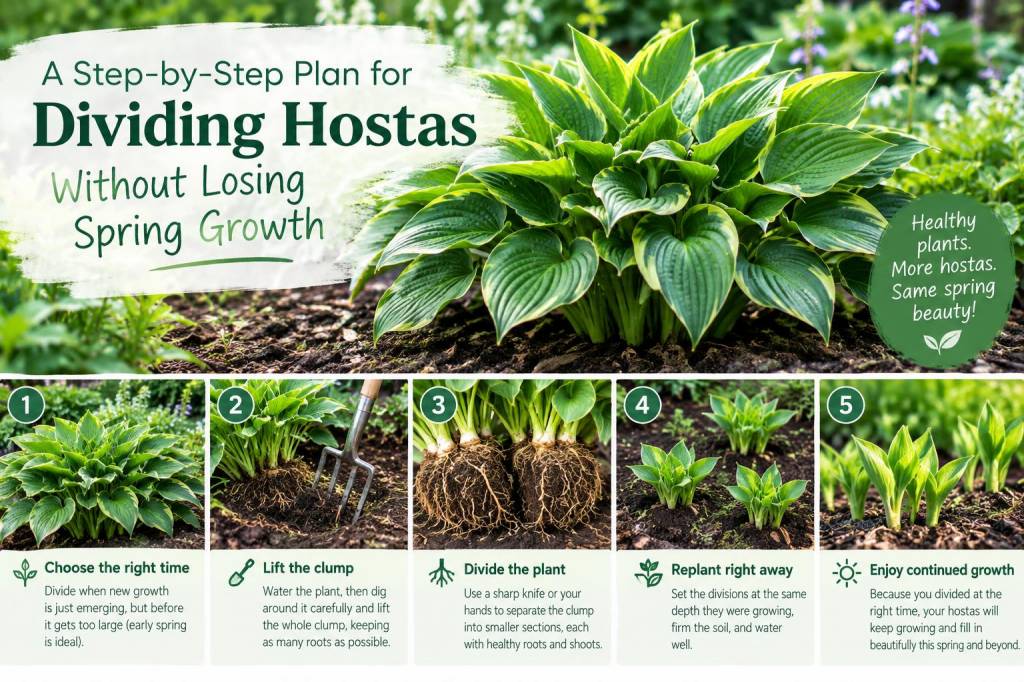
I have learned that dividing hostas is one of those garden jobs that looks simple on paper and feels slightly nerve-racking once you see fresh spring shoots pushing through the soil. My main goal is always to protect that early growth, because hostas put on a surprising amount of new tissue very quickly when temperatures rise. If I divide too late, I risk snapping tender leaves, disturbing roots that are already active, or setting the plant back for a full season. Over time, I have settled on a careful, repeatable approach that keeps the plant healthy and gives me strong new divisions without sacrificing the spring display.
Hostas are forgiving plants, but they still ask for timing, a steady hand, and a little patience. I divide them when I can match cool weather, moist soil, and enough time for the roots to settle before summer heat arrives. Once I started thinking of division as a slow transplant rather than a quick chop, the results improved dramatically. The plant recovered faster, the divisions established more confidently, and I stopped losing so much of that precious spring growth.
Why timing matters so much with hostas
Hostas wake up early, and once the first shoots emerge, they begin spending energy on leaf expansion. That means every cut, lift, and move has a direct effect on visible growth. If I divide too early, when the crown is still asleep and the soil is cold, the plant may sit in place for too long. If I divide too late, when leaves are already unfurling, I often damage more foliage than I save. In my experience, the most comfortable window is when the shoots are just beginning to emerge or when the leaves are still tightly furled and short.
I also watch the weather forecast. A cool stretch with gentle rain or steady soil moisture gives hostas a much better chance of settling in. Hot, windy days increase stress very quickly, especially for divisions that have lost part of their root system. If I must divide during a warmer period, I make sure the plants are well watered beforehand and I move them into lightly shaded conditions right away.
What I prepare before lifting a clump
I always gather everything first, because once the plant is out of the ground, I want to work efficiently. My usual setup includes a sharp spade, a garden fork, clean pruners, a hose or watering can, and a tarp or wheelbarrow for moving the clump. I also like to have fresh compost, loose soil, and mulch ready for replanting. If I am working with a very large plant, I sometimes use a serrated garden knife or even two forks back to back to separate the crown more cleanly.
Clean tools matter more than people often expect. A sharp blade makes cleaner cuts and causes less crushing in the crown and roots. I wipe my tools before I start and again between plants if I am dividing several hostas in one session. That small habit helps reduce disease spread and keeps the cuts neat.
My step-by-step method for dividing without stressing spring growth
I begin by watering the hosta deeply the day before, or at least a few hours before I dig. Moist soil loosens more easily and helps the roots hold together. Then I cut back any fully expanded leaves if they are in the way, but I never strip the plant bare unless I have no other choice. I want to preserve as much foliage as possible because every leaf can help the division recover.
Next, I dig around the outer edge of the clump, staying a few inches away from the crown so I do not slice directly through the center too soon. I loosen the soil all the way around and then lift the entire clump carefully with a fork or spade. If the plant is large, I may loosen one side first, tilt it gently, and work around the root ball until it releases. I avoid yanking, because hosta roots tear easily when the soil is still compact.
Once the clump is out, I shake off only enough soil to see the crown structure. Then I look for natural points of separation. Hostas often split into sections more easily than I expect, especially older plants with several crowns. If the plant pulls apart by hand into obvious pieces, I take that route. If not, I cut between crowns with a clean knife or spade, making sure each division has several healthy buds and a decent portion of roots.
I aim for divisions that are strong rather than tiny. Small pieces can survive, but they often need more time to recover and may skip a season of strong growth. For a plant that is already pushing spring leaves, I prefer medium-sized divisions with enough stored energy to resume growth quickly. When in doubt, I keep the pieces a little larger.
After separating the plant, I trim any damaged roots and remove broken leaves. If a division has a lot of exposed roots, I keep it shaded and moist while I prepare the planting holes. I do not let the roots dry out, even briefly, because that can slow recovery more than many gardeners realize.
How I replant divisions for faster recovery
I replant hostas at the same depth they were growing before, or just slightly higher if the soil is heavy and prone to settling. The crown should not sit too deep, because buried growth points can rot or emerge weakly. I spread the roots out in the planting hole, backfill with loosened soil, and water thoroughly to remove air pockets.
I like to mix a little compost into the backfill, but I do not overdo it. Too much rich amendment can create a planting pocket that behaves differently from the surrounding soil, which sometimes causes uneven water retention. A modest amount of compost is enough to improve structure and give the division a gentle start.
After planting, I mulch lightly around the base, keeping mulch away from direct contact with the crown. This helps retain moisture and stabilizes soil temperature. I then water again if the weather is dry. During the first few weeks, I keep a close eye on the divisions and make sure they do not dry out. A young hosta division can look tired at first, but steady moisture usually brings it back quickly.
What I do with the original plant after division
If the original clump still has a strong core, I replant it in the same spot or move it slightly to refresh the design. In some cases, I like to improve the planting area at the same time by loosening compacted soil and adding a little compost beneath the roots. Hostas appreciate a soil that drains well but still holds moisture, so I think of this as a chance to correct any problem in the bed rather than simply putting the plant back where it came from.
When I divide a hosta that has become crowded or leggy, I often notice that the center of the clump is less vigorous than the outer sections. That is normal. I remove any weak or woody center portions and keep the healthier outer crowns. This gives me stronger plants and a cleaner shape in the bed.
Common mistakes that cost spring growth
The biggest mistake I see is waiting until leaves are already long and open. At that stage, the plant is spending energy above ground, and division becomes much more stressful. Another common error is planting the divisions too deep. Hostas need air around the crown, and buried crowns often struggle.
I also avoid dividing during bright midday sun. Even a short exposure can wilt tender leaves and dry roots faster than expected. Early morning or a cloudy day gives me a much better margin for success. And I never assume that a division can survive with just a casual sprinkle of water. Newly divided hostas need deep, consistent watering until they are clearly rooted again.
Another issue is making divisions too small. It can feel satisfying to create many new plants, but tiny pieces often recover slowly and can lose the season’s momentum. I have had far better results by taking fewer, stronger divisions.
Signs that a division is recovering well
In the first week, I look for firm leaves, no severe wilting, and soil that stays evenly moist. In the following weeks, healthy divisions begin to expand new leaves from the crown. That new growth may look smaller at first, but it should appear steady and upright. If the leaves remain limp or the soil stays soggy, I adjust watering and check drainage.
Sometimes a newly divided hosta seems paused for a while, especially if spring temperatures fluctuate. I have learned not to panic too early. As long as the crown remains firm and the roots are not rotting, the plant often resumes growth once conditions settle.
A simple timing table I use in my own garden
| Condition | My choice | Reason |
|---|---|---|
| Shoots just emerging | Excellent time | Less leaf damage and faster recovery |
| Leaves still tightly furled | Very good time | Roots can reset before heavy top growth |
| Leaves fully open | Use caution | Greater stress and more visible loss |
| Hot, dry weather | Avoid if possible | Higher risk of wilting and slow establishment |
| Cool, moist weather | Ideal | Roots settle more easily |
Extra care during the first month after division
For the first month, I keep the soil evenly moist and watch for signs of heat stress. If the sun is strong, I may give the divisions temporary afternoon shade with a lightweight fabric or by using nearby plants for shelter. I do not fertilize heavily right away, because I want the roots to settle before asking for strong top growth. A gentle start works better than an aggressive one.
If a division looks especially weak, I remove any damaged leaves so the plant can focus energy underground. That said, I avoid overpruning. Leaves are still useful, and a few healthy ones can support recovery. My rule is simple: remove what is broken, preserve what still works.
When I divide hostas carefully, I get cleaner plants, healthier roots, and far less spring disruption. The whole process becomes easier once I stop rushing and start reading the plant’s stage of growth. Hostas are generous perennials, and with the right timing and handling, they repay that care with strong new clumps and a fuller garden presence season after season.