I once thought succulents were indestructible. Then I overwatered a tray of sedums and watched them go from plump and glossy to translucent and mushy within a week. Since then I’ve learned how to rescue overwatered succulents reliably — and how to prevent the panic in the first place. If you’ve spotted soft stems, black roots, or wet soil that never dries, this step-by-step plan will help you save what you can, rebuild healthy root systems and repot into a mix with perlite for better drainage.
How to tell if your succulent is overwatered
Before you start digging plants out of their pots, check the symptoms so you know you’re dealing with overwatering and not another problem like frost or pests.
- Soft, translucent leaves that look waterlogged or feel squishy.
- Leaves dropping easily with a gentle tug, often starting from the bottom.
- Black, brown or mushy roots when you lift the plant: a reliable sign of rot.
- Soil that stays wet for days or smells sour/musty.
- Stem collapse or brown/black sunken areas on the base.
If several of these are present, treat it as overwatering and act quickly. The longer a rot sits, the lower the chance of recovery.
What you’ll need
Gathering supplies before you begin makes the process faster and reduces handling stress for the plants.
- Clean workspace (a table with newspaper or a tray)
- Gloves and clean scissors or pruning shears
- Fresh succulent or cactus potting mix (I like mixes with pumice or perlite)
- Perlite — good quality horticultural perlite (brand examples: Espoma, Dr. Earth)
- Optional: horticultural charcoal (helps odor and drainage)
- Small pots with drainage holes (terracotta speeds drying)
- Isopropyl alcohol or diluted bleach solution for disinfecting tools
- Labels and a spray bottle
Step-by-step rescue plan
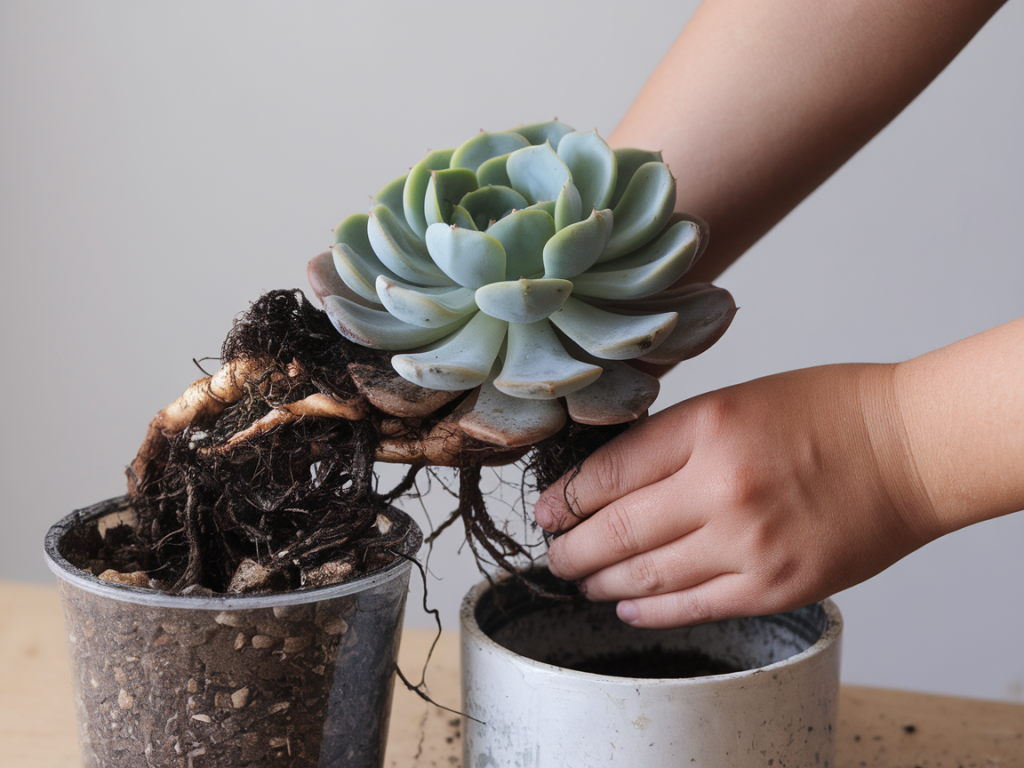
Step 1 — Remove the plant from the pot gently. Turn the pot on its side, support the base of the plant, and ease it out. If roots have grown into the drainage hole, push gently from below. Avoid yanking, which can tear healthy tissue.
Step 2 — Inspect roots and stems. Shake off as much old soil as possible. Use a soft brush or your fingers. Healthy roots are white or tan and firm; rotted roots are black/brown and mushy. Cut away all soft, discolored roots and any mushy parts of the stem with sterile scissors. Disinfect scissors between plants to prevent spreading pathogens.
Step 3 — Let the wounds dry and callus. After cutting, leave the plant out of soil in a dry, shaded spot for 24–72 hours so cuts can callus. This is especially important for rosette-forming succulents and leaf-propagated species. I place them on a tray in an airy room; avoid direct sun during this vulnerable phase.
Step 4 — Treat severe root rot if needed. For major infections, you can dip trimmed roots in a fungicide like copper-based products or use a diluted hydrogen peroxide rinse (1 part 3% H2O2 to 4 parts water) to help kill pathogens. Use sparingly and rinse afterward with fresh water. Many gardeners also dust the cut areas with cinnamon — a mild antifungal — before replanting.
Step 5 — Prepare a fast-draining mix with perlite. Good drainage is the heart of succulent recovery. Mix equal parts commercial cactus mix and perlite for faster drying, or try:
- 2 parts cactus/succulent potting mix
- 1 part horticultural perlite
- Optional: 1/2 part pumice or coarse sand for even more drainage
I prefer adding perlite because it’s lightweight, inexpensive and improves aeration dramatically. For heavy soils, increase perlite to 1:1 with the mix.
Step 6 — Choose the right pot. Use a pot with drainage holes. Unglazed terracotta is ideal because it wicks moisture away from the soil. If you must use plastic, be extra careful with watering amounts and frequency.
Step 7 — Repot shallow with care. Place a small layer of the new mix in the pot, position the succulent so it sits at the same depth as before, and gently fill around the roots. Don’t pack the soil firmly; a light tamp is enough. For offsets and cuttings, let the bottom of the stem callus for a day or two before planting into the mix.
Step 8 — Don’t water immediately. After repotting, wait 3–7 days (longer for larger root cuts) before the first light watering. This gives roots a chance to re-establish. When you do water, use a light soak — water until it runs out the drainage hole, then let the soil dry completely before the next watering.
Aftercare and monitoring
Recovery can take weeks to months depending on damage. Here’s how I monitor progress:
- Keep plants in bright, indirect light. Avoid harsh midday sun until they show new growth.
- Check the soil moisture by finger or a moisture meter. Only water when soil is fully dry at least an inch down.
- Watch for new, firm growth and gradually increase light exposure over 2–3 weeks.
- If rot returns, repeat root inspection — sometimes more trimming is needed.
Prevention: watering habits and potting tips
Prevention is simpler than cure. Here are the habits I use to keep succulents happy:
- Water deeply, infrequently. Let the soil dry out between waterings. Frequency varies by season — every 2–4 weeks for many succulents in summer, less in winter.
- Use appropriate pots and mix. Drainage holes + porous mix = fewer problems.
- Match plant to conditions. Some succulents (e.g., haworthias, gasterias) like more moisture than others (e.g., echeverias). Group plants with similar needs.
- Avoid saucers full of water. Empty trays within 30 minutes of watering if you use a catch saucer.
- Consider bottom-watering for messy setups: set pots in a shallow water tray for 10–20 minutes then let drain thoroughly.
When rescue isn’t possible
Sometimes the rot has gone too far. If a plant is mushy at the base with no firm tissue left, focus on salvaging healthy leaves or offsets for propagation. Many succulents can be regenerated from a single leaf or healthy stem cutting — allow cut pieces to callus and root in a fast-draining mix.
Rescuing overwatered succulents taught me to trust quick action and to favour airy soils. Perlite is a small addition that makes a large difference by improving drainage and preventing the anaerobic conditions where rot thrives. With a little patience and careful repotting, most succulents can surprise you with new roots and fresh growth.