I hate losing a favourite container plant to root rot. Over the years I’ve rescued tomatoes, geraniums and even a beloved potted hydrangea by spotting the problem early and acting decisively. Root rot in containers is one of those silent killers: the top growth can look only slightly droopy while the roots are already turning brown and slimy. In this article I’ll walk you through how to diagnose the cause and save plants in five targeted steps that I use in my own small garden projects.
How to recognize root rot quickly
Root rot shows up in a few telltale ways. When I’m inspecting a troubled pot I look for these signs:
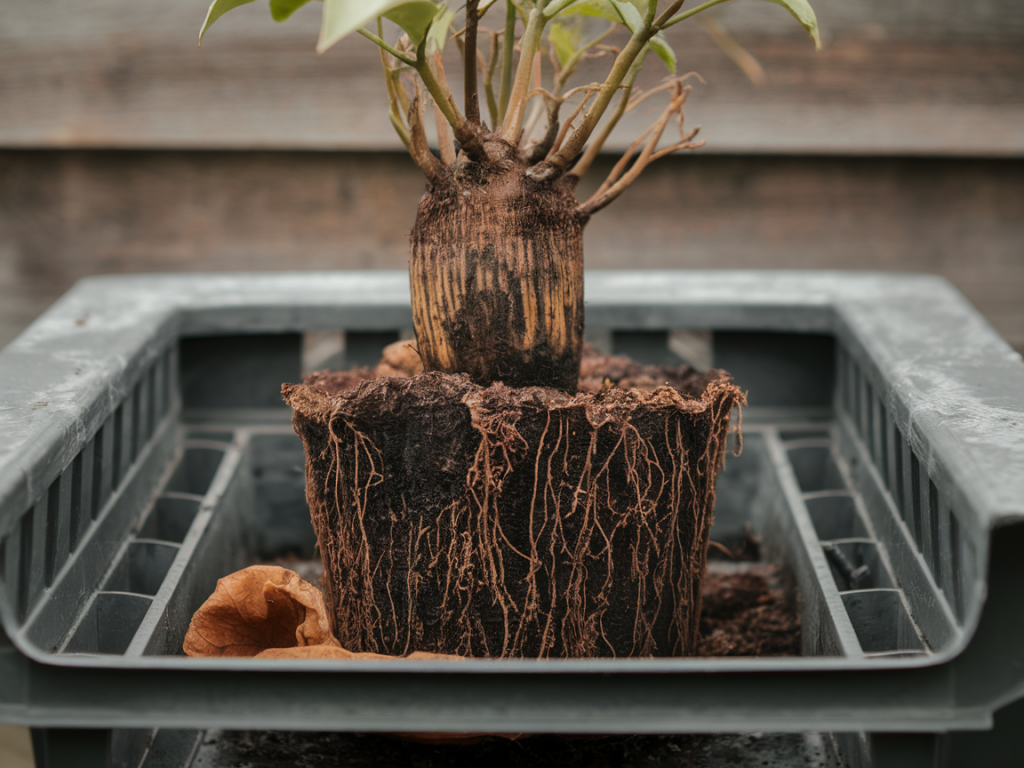
Wilting and yellowing leaves despite regular wateringStunted new growth or sudden leaf dropFoul, musty odour from the soilDark, mushy roots when you slide the plant out of the potTopsoil that feels continually waterlogged or compactedOften the above-ground symptoms are vague, which is why I recommend gently removing one plant from its pot if you suspect a problem. Healthy roots should be firm and white or tan; roots affected by rot are brown/black, soft and may come away in clumps.
Common causes of root rot in containers
Root rot is rarely a mystery once you understand the three main drivers I see again and again:
Poor drainage: pots without drainage holes or blocked holes prevent excess water from escaping.Overwatering: watering on a rigid schedule rather than by plant need keeps soil constantly wet.Poor potting mix or compacted soil: heavy garden soil or old potting mix that breaks down holds too much water.Less common contributors include pathogens such as Pythium and Phytophthora, which thrive in wet conditions; contaminated tools or recycled soil; and dense planting where roots can’t breathe.
Five targeted steps to stop root rot and save the plant
When I find root rot, I follow this five-step routine. Each step targets a specific problem so your chances of saving the plant increase quickly.
Isolate the plant and assess severity. As soon as you suspect root rot, move the pot away from other containers so disease won’t spread. Carefully lift the plant from its pot and examine the roots. If over 70% of the root system is mushy and black, the plant is unlikely to recover; consider propagating healthy cuttings before discarding the rest. If the damage is partial, continue.Trim damaged roots and wash the rootball. Using clean, sharp shears (I use a pair of Fiskars pruners and wipe them with isopropyl alcohol beforehand), remove all obviously dead or slimy roots until only firm, pale roots remain. Gently rinse soil from the roots under a stream of lukewarm water—this reveals hidden rot and helps you trim more precisely.Disinfect and treat the roots. For mild infections I soak the trimmed roots in a solution of 1 part hydrogen peroxide (3%) to 4 parts water for 10 minutes—this helps kill many soil-borne pathogens and oxygenates the roots. For persistent or severe cases, a fungicide labelled for Pythium/Phytophthora can be helpful; products containing mefenoxam or phosphorous acid (phosphite) are commonly recommended in container situations. Follow the product label carefully.Repot into fresh, fast-draining mix and a clean container. Discard old potting mix—do not reuse it. Choose a container with adequate drainage and consider elevating it slightly using pot feet or broken crocks to improve flow. I favour mixes with plenty of aeration: combine a commercial potting mix with added perlite or pumice (20–30%) and a handful of coarse horticultural sand for heavier plants. Replant at the same depth as before and firm the mix lightly without compacting.Adjust watering, light and care to prevent recurrence. After repotting, water sparingly to help the plant recover—just enough to settle the mix. Do not fertilize for at least two weeks; newly recovering roots need time to regrow. Move the container to bright, indirect light (avoid harsh afternoon sun until new roots form). Monitor soil moisture by finger-testing the top 2–3 cm: only water when that layer is dry.Practical prevention tips I swear by
Prevention is easier than a cure. I’ve adopted a few simple habits that reduce the chance of root rot in all my containers:
Use pots with drainage holes — and never block them.Choose lighter potting mixes and refresh surface soil yearly.Top-dress with fresh mix or compost in spring rather than fully replacing unless needed.Pot up only when the plant roots are crowded; avoid excessively large pots relative to the rootball (too much soil stays wet).Water based on need, not schedule; consider a moisture meter like the Meterstick or a simple bamboo probe.Improve airflow around grouped containers by spacing them and using pot feet.Quick troubleshooting table
| Problem | Likely cause | Immediate action |
| Yellowing leaves, soggy soil | Poor drainage or overwatering | Inspect roots, trim rot, repot in airy mix |
| Foul smell from pot | Advanced root rot/pathogen | Isolate, remove plant if >70% roots affected; disinfect pot |
| Plant wilts a day after watering | Root damage preventing uptake | Check roots, cut damaged parts, reduce watering |
When to propagate instead of saving the original
Sometimes it’s wiser to start again. If most of the root system is gone or the stem is rotting at the crown, I take healthy cuttings or tip layers and propagate them in fresh, sterile mix. For many ornamentals and herbs this is faster than trying to nurse a hopeless root system back to health. Use quick-rooting hormone and place cuttings in a warm, humid environment until roots form.
If you prefer products, I’ve had good results with the JoJo Plant Moisture Meters for monitoring and Espoma Organic Potting Mix combined with perlite for a fast-draining medium. For stubborn pathogen issues, a targeted phosphite spray or drench—used carefully according to label instructions—can protect vulnerable plants during recovery.
Root rot is discouraging, but it’s one of the most manageable container problems once you learn the signs and act decisively. With clean tools, the right mix and a bit of patient care your plant has a great chance of bouncing back.